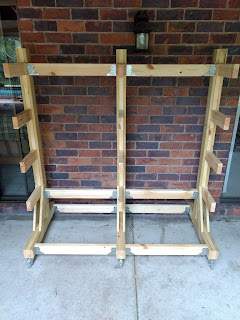
Mobile Lumber Rack
Designing and making a mobile lumber rack
As I (Jonathan) delved more seriously into wood work over the last year, it became quite clear that I needed a lumber rack. Increasing volumes of wood have been stacking up in one of the garden sheds, on top of eski, camping gear and the like—not a very practical arrangement for an ongoing hobby.It was time to make a lumber rack.
Requirements
- As we are renting, my lumber rack would have to be stand-alone (as opposed to attaching to exiting walls/ceilings).
- It would need to fit through the door of said garden shed (so not too high), not be very deep (since the biggest, non-negotiable space-taker in that shed is a ride-on mower), and of course not be too wide for the available shed space.
- Obviously, it would need a good number of shelves for lumber, and also have space for wider sheets of ply or the like.
- It would be preferable for it to be mobile, so it could be rolled out from the wall to access the back of it (where the wider sheet ply would stand).
- It should be in some way dismantle-able for moving house. I don't like this point, but we are renting, so it always has to be kept in mind.
I hunted around the internet for some ideas, before drawing up some plans, buying the materials, and away we went!
Construction
The main frame is made from 90 x 35mm untreated pine ($3 per linear metre). Cut pieces to size and layout the first frame:
'Clad' / reinforce the frame on one side with 90 x 22mm treated pine decking ($3.28 per linear metre) (I prefer the stuff I get from a local lumber company, as it doesn't have the 'reeded' non-slip grooves that the Bunnings stuff in that link has):
Flip it over:
And repeat the 'cladding' / reinforcing on the other side:
And then repeat twice more, to make 3 frames:
Cut 8 equal-length braces from the 90 x 35mm timber. Screw 2 joist hangers ($1.70 each) on each end of each brace (only 4 of the 8 are pictured here):
Screw 2 swivel castors on the bottom of each of the 3 frames (the smallest I could find with a suitable weight rating—100kg per castor—cost $10.80 each; that's a total weight rating of 600kg).
Screw 4 of the braces on the vertical part of the frame, and the other 4 on the base of the frame. (If we need to move house, these 8 braces will need to be unscrewed, leaving me with a much more compact 3 flat frames, and 8 braces.) And it's done!
I am very pleased with how it came out—it will do the job perfectly. It meets all requirements. It is very solid. It will last.
In the photo below, I have stacked some timber on it, just for demo. (I need to do a little rearranging in the shed before it can go in its final home, and take its full load.) It rolled around with that load on it with ease, and no sign of creaking frame or the like. ☺
Sheets of ply (or the like) can be stacked, standing, on the back:
Dimensions
- Total width: 162.5cm
- Total height: 172.5cm (including castors, which added 10cm)
- Total depth: 75cm
- Main shelves: 30cm deep, with 27cm height before the next shelf (top shelf has a 10cm high post at the back)
- Bottom shelf: 24cm deep (in front of the brace)
- Brace angle: 58.4° / 31.6°, depending which way you measure it (this was simply the most acute angle possible on my mitre saw ☺)
- Rear shelf: 20cm deep
(If anyone really wants CAD drawings—I've messed around a little in FreeCAD in the past—feel free to ask me. I never got further than pencil sketches before actually building this. ☺)
Materials / Cost (almost all from Bunnings)
- 16 metres of 90 x 35mm untreated pine ($3 per linear metre) – $48
- 16 metres of 90 x 22mm treated pine decking ($3.28 per linear metre) – $52
- 16 joist hangers ($1.70 each) – $27.20
- 6 swivel castors ($10.80 each) – $64.80
- ~450 screws (most, used in the 3 frames, were 50mm long). At around 5¢ each, that's ~$20
And it's always a nice feeling to have designed and made another useful item with your own hands!


Comments
Post a Comment